Loading course navigation
Loading lesson
50 min
Student Lesson
Lesson 42: Multimedia Civic Memory Brief, Creating a Cover
Content
Students will choose images for the multimedia cover component and write headlines and captions.
Language
Students will write headlines and captions for the images on their covers to explain the images and connect to their thesis.
How does storytelling become a tool for civic change?
What is civic memory, and how does testimony help us remember and learn?
Knowledge-Building:
Students choose relevant civil rights images for their covers and include informational headlines and captions.
Enduring Understanding:
People shape civic memory through storytelling.
Future Lessons:
In Lesson 43, students will peer review each other’s Civic Memory Briefs and revise accordingly.
Unit Performance Task:
This lesson guides students through the visual phase of their performance task by showing them how to create digital covers for their briefs.
| Lesson Flow | Purpose of Learning Experience |
|---|---|
Launch5 Minutes | Students will discuss with a partner a goal they have for their multimedia cover. |
Literacy Lab10 Minutes | Students will review the use of verbals and passive vs. active voice in writing to prepare for draft revisions and edits in subsequent lessons. |
Learning in Action30 Minutes | Part A: Examine Exemplar Images, Headlines, and Captions (W.8.2.a) Students will examine an exemplar cover and discuss the process of choosing images and writing relevant headings and captions. Part B: Create a Cover with Images, Headlines, and Captions (W.8.2.a, W.8.6) Students will source two images for their multimedia covers and write headlines and captions for their images. |
Material List
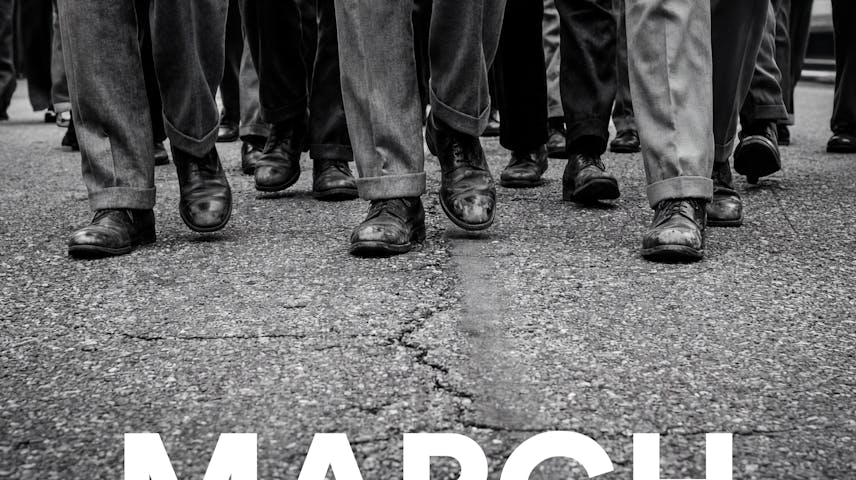
March: Book One, by John Lewis, Andrew Aydin, and Nate Powell
Unit 1 Lesson 42 Student Edition
Multimedia Civic Memory Brief exemplar (from Lesson 40)
Routines
Turn and Talk
Think-Pair-Share
Display the Civic Memory Brief exemplar cover page with headlines and captions. Remind students that part of their brief is to create a cover that is organized with relevant visuals, clear headings, and descriptive captions. Remind students that they saw this cover in Lesson 40.
Headline: 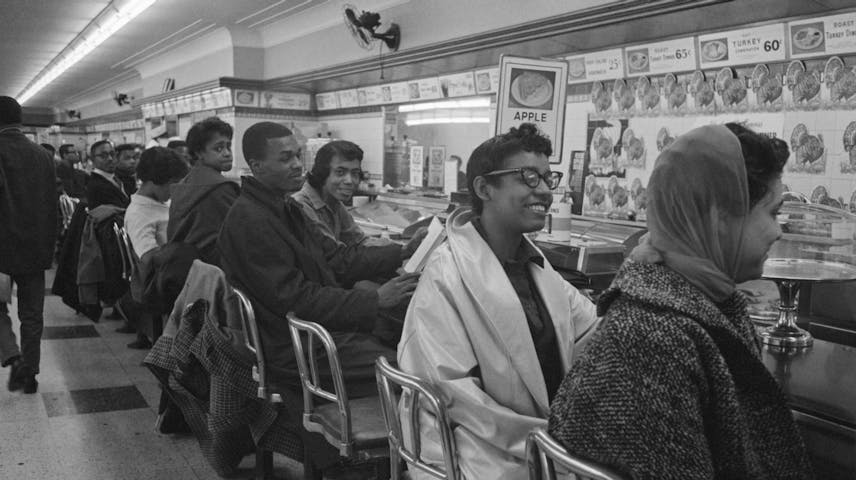 Activists hold a sit-in against segregation at a Nashville lunch counter, 1960. | Headline:  Activists hold a demonstration outside a Woolworth’s to protest segregation. |
|---|
Say these Directions: Look at the cover with images, headlines, and captions to help you set some goals for your cover. Turn to your partner, and quickly discuss what your writing goals are for today related to your cover.
Today, I want to figure out what images I want to use on my cover to connect to my essay and how to write clear headlines and captions to support the images, my thesis, and the overall ideas in my essay.
Take two or three quick responses in a whole-group share-out.
Say: Today, you will choose images for your brief cover and write headlines and captions. But first, we’ll review a few writing skills that will help you when you revise your brief.
Remind students that they investigated verbals in Lessons 10 and 16.
Say: Verbals are words formed from verbs that function as nouns, adjectives, or adverbs.
Say: The three types of verbals are gerunds, participles (present and past), and infinitives.
Present sentence examples from March.
Say these Directions: Consider these sentence examples from March. Identify the verbals and name each type of verbal - gerund, participle (present and past), or infinitive.
“But the next day, they sat me down for questioning, asking me what happened the previous day.”
gerund
“They said they didn’t want anything to do with filing a suit against the state of Alabama.”
infinitive, gerund
Remind students that verbals can make a text clearer and more precise, especially for connecting evidence to your interpretation of it. Show an example, and again, let students point out the verbals and name them.
“By marching to city hall and testifying directly to the mayor, activists succeeded in convincing him to take a moral stand on the issue.”
three gerunds
Remind students that they investigated passive and active voice in Lesson 37.
A sentence in passive voice describes a verb being done to something or someone, called the object of the sentence.
For example, in the sentence “Protesters were arrested at the march,” protesters is the object of the verb arrested.
A sentence in active voice describes a verb being done by something or someone, called the subject of the sentence. It may also include an object that the verb is done to.
For example, in the sentence “Police arrested protesters at the march,” police is the subject of the verb arrested, and protesters is the object.
Passive voice highlights who or what an action is being done to, and the active voice highlights who or what is performing the action. Think about which effect you might prefer and why.
Ask: Why might someone choose to say “Protesters were arrested” vs. “Police arrested protesters”?
You might say the first one if you wanted to focus on the protesters and what happened to them. You might say the second one if you wanted to focus on the police and how they treated the protesters.
Emphasize that students will need to choose which voice to use by thinking about the effect it will have. Especially when describing an injustice, even professional writers and editors disagree on whether it is better to emphasize the victims by using the passive voice or emphasize the responsibility of the perpetrators by using the active voice.
Transition:
Say: When you revise your drafts, you will need to make decisions about how to write your ideas. Your writing will be stronger if you consider those decisions in terms of the effect they will have on your reader.
Direct students back to the cover of the Civic Memory Brief exemplar.
Headline: Activists hold a sit-in against segregation at a Nashville lunch counter, 1960. | Headline: Activists hold a demonstration outside a Woolworth’s to protest segregation. |
|---|
Say: The first image I chose is a photo of students participating in a sit-in at a lunch counter in Nashville in 1960. I think this is important because it shows what the activists were fighting for and how peaceful their approach was. This connects to my chosen event and thesis about how the Nashville sit-ins used memory and testimony to make change. In my headline, I included basic information to describe the photograph: “Students hold a sit-in against segregation at a Nashville lunch counter, 1960.” Then, in the caption, I added details: “Activists trained to remain peaceful and polite, even as they were attacked, harassed, and arrested.” This helps emphasize why change was necessary.
Say these Directions: Look at the second image in the exemplar from the Lesson Launch, then discuss with a partner why you think this image was chosen and how the headline and caption help support the image.
I think the second image was chosen because it shows how violent people were against the protesters, even though they remained peaceful. The headline explains that reactions came from the public and also police officers. The caption further explains that the police only arrested the activists and ignored the violence of the people acting against them. I think this shows why activists like Diane Nash gave testimony to the mayor about this violence to bring about change.
Transition students into creating the cover pages of their Civic Memory Briefs. Encourage students to use technology to search for images and create their cover.
Say: Now you’re going to focus on the cover page of your Civic Memory Brief. Think about how effective it was for John Lewis to put his autobiography in the form of a graphic novel. Your brief will also use the power of visuals, headings, and descriptive captions to relate to your writing.
Say these Directions: Search for images in March, other selected texts, or trusted online sources. Select two images related to your chosen event and add them to your covers. Then add headlines and captions for each image.
Say: Remember that each image will need both a headline and a caption. Think about what is shown in each image and how you can explain it with a headline and give further information with a caption to help tell the story of the image more effectively.
Allow students to take the rest of the time to create their brief covers by finalizing their images and writing headlines and captions.
Say: Take the rest of the time available to finalize your images and write one headline and caption for each. Remember to check your image choices against your thesis statement and your draft to make sure they align.
After 15 minutes, invite students to share their images, captions, and headlines with a partner.
Say these Directions: With your partner, share an image you chose and the headline and caption you wrote. Explain why you chose the image, headline, and caption.
I chose an image from p. 118 of March of people giving testimony to the mayor about the violence. This connects to my essay because my event is the sit-ins in Nashville and the march on city hall, and my thesis is how these activists used memory and testimony to make change. I wrote the headline “March on city hall, Nashville, 1960” because it tells the name of the event as well as when and where it happened. I added the caption “Activists gave a powerful testimony to the mayor of Nashville about the ongoing violence against them” because it gives more information about what happened at that event and why.
Reflection (W.8.2.a) |
|---|
Reflect on your ability to create covers for your briefs using the Reflection routine.
|
Teacher Tip |
|---|
If you are equipped to do so, allow students to search the internet for relevant images while keeping necessary safety procedures in place. Most significant events from the Civil Rights Movement are well photographed, and primary source photographs can be a great supplement to the images in the anchor text. |
Instruct students to revisit their writing goals and self-assess whether they met them today or not. Then have them discuss their thoughts with a partner and be prepared to share with the larger class.
Say these Directions: Think back to the writing goal you set at the beginning of this lesson. Did you meet it? If so, what techniques helped you meet it? If not, how will you try to meet the goal to finalize your cover?
I met my goal because I chose two images and wrote a headline and caption for each that help explain the images. The cover as a whole adds to my essay because it ties to my civil rights events and further expands on my thesis.
Introduce the homework to complete before the next lesson:
Finish your Civic Memory Brief covers, including relevant images, headlines, and captions, for the next lesson.
March: Book One
John Lewis, Andrew Aydin, Nate Powell