Loading course navigation
Loading lesson
50 min
Student Lesson
Lesson 22: Flex Research: What the Camera Shows and Hides
Content
Students will analyze how a photographer’s perspective shapes what a historical photograph reveals and hides about Japanese American incarceration and compare this representation with how ideas are represented in a text.
Language
Students will explain visual choices using source-based language and analytical terms such as framing, perspective, proximity, and cropped out.
Foundational Skills
Students will gather and record relevant visual and textual evidence from photographs, captions, and the unit text to prepare for a follow-up annotation task.
How can readers evaluate words and images for accuracy, perspective, and ethical use?
Knowledge-Building:
Students build on the study of testimony, photography, and multiple perspectives in Seen and Unseen by analyzing how photographers document and interpret incarceration.
Enduring Understanding:
Historical understanding depends on how events are documented and interpreted, including what a source includes and what it leaves out.
Future Lessons:
In future lessons, students will continue to conduct research and to use today’s organizer to aid them in the analysis of images and the perspectives they reflect.
Unit Performance Task:
Today’s work prepares students to choose and explain photographs ethically in their “Witness to History” multimedia exhibit or podcast segment.
| Lesson Flow | Purpose of Learning Experience |
|---|---|
Launch5 Minutes | Students activate prior knowledge about witness, testimony, and visual evidence by noticing what a photograph shows first and wondering what it leaves out. |
Literacy Lab10 Minutes | Students learn the Visual Rhetoric routine and practice moving from description to analysis using framing, subject positioning, and absence. |
Learning in Action30 Minutes | Part A: Compare Image and Text Representations (RI.7.6, RI.7.7) Students examine an archival photograph closely and compare and contrast it with a representation of the same idea in a selected text. Part B: Annotate a Photograph’s Perspective (W.7.8, RI.7.6) Students write a short perspective annotation and begin a production extension by sketching an alternate frame. |
Material List
Seen and Unseen by Elizabeth Partridge and Lauren Tamaki
Unit 2 Lesson 22 Student Edition
3-Column Chart graphic organizer
Media Literacy Image Analysis graphic organizer
Selected archival photographs from Seen and Unseen or other teacher-selected sources
Short informational selection from Seen and Unseen or teacher-selected informational text describing daily life in the barracks at Manzanar
Routines
Turn and Talk
Think-Pair-Share
Quick Write
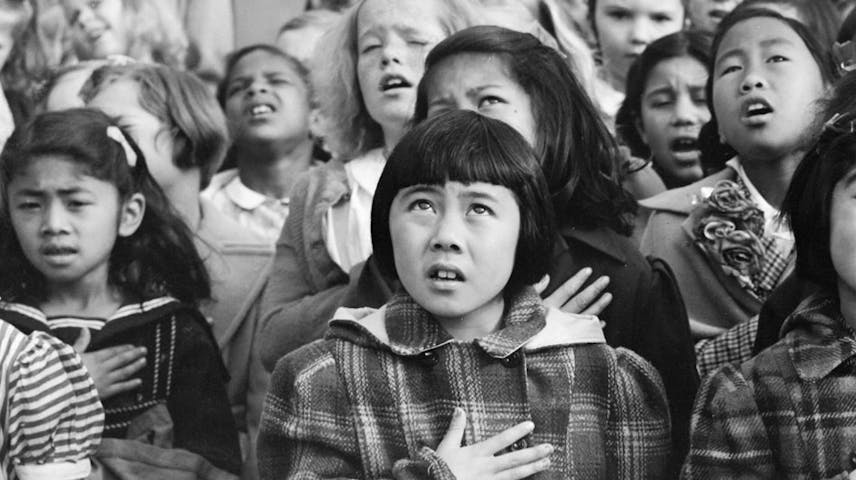
Display the launch photograph without reading the credit line or contextual note yet.
Use this brief partner talk to connect students back to the unit’s work on witness and perspective. Remind students that a photograph is evidence but that it is also a made source.
Say these Directions: In the previous lesson, we looked at how testimony and images can help us witness history more carefully. Today, we are taking that a step further by asking how a photographer’s choices shape what we notice first and what we might miss.
Ask: What do you notice first in this photograph, and what do you think might be outside the frame?
I notice the tags the children are wearing first because they stand out and make the family seem like they are being processed or moved. I think there could be more people, guards, or something else they are looking at outside the frame that we cannot see.
Connection to Today’s Learning:
Say: Today, we will practice reading photographs the way we read texts: by asking who made them, what choices they made, and how those choices shape meaning.
Teacher Guidance: The teacher-maintained model topic for this research sequence is How did photographs shape public memory of Japanese American incarceration? Keep returning to this same model topic so students see the research skill build across lessons.
Explain that images are not neutral records. A photograph is a source created by a person who makes choices about angle, distance, subject, and what to leave out.
Say these Directions: Open your 3-Column Chart graphic organizer. Today we are going to use it to move from simply describing a photograph to analyzing the perspective behind it. Label the columns “Composition/Framing,” “Subject Positioning,” and “Absence.”
Teach: Reading a Photograph for Perspective
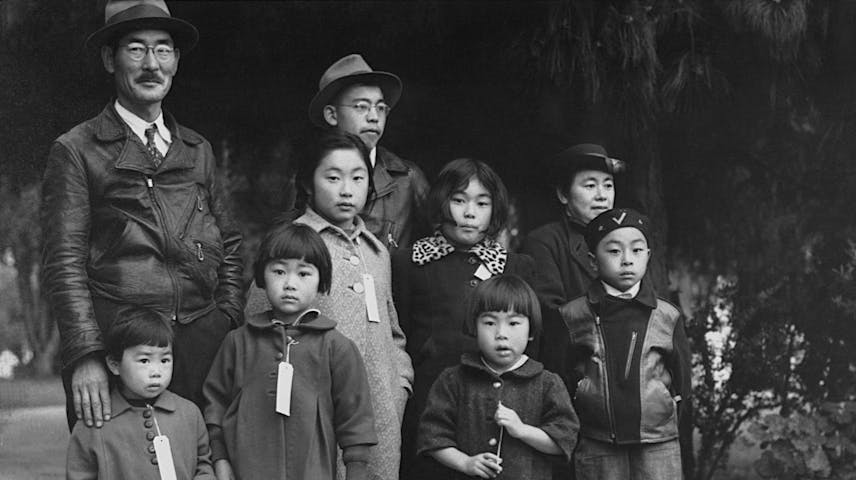
When I analyze a photograph, I first name what is literally there, but I do not stop there. Next, I ask what the photographer wants me to notice first through framing and proximity. In this image, the family and their tags are close enough to stand out, so the photo makes forced removal feel personal and immediate. I also ask what is absent, because what is cropped out can change the story viewers build in their minds. That is how I move from description to perspective.
Display this teacher model as students listen:
Composition/Framing | Subject Positioning | Absence |
|---|---|---|
Visual rhetoric move: The family is grouped tightly near the center. | Visual rhetoric move: The tags, how close together they’re standing, and the handles on the luggage at their feet are easy to see. | Visual rhetoric move: We cannot see the whole crowd or who is directing them. |
What it helps me understand: Viewers focus on people, not the larger setting. | What it helps me understand: The image emphasizes anxiety, displacement, and official control. | What it helps me understand: The photo gives one angle on the event, not the full scene. |
Say these Directions: Add two notes to your organizer under each of these headings: Composition/Framing, Subject Positioning, and Absence. Be ready to explain how one choice shapes what viewers understand.
Ask: Which visual choice in the launch photograph most shapes your understanding of the family’s experience, and why?
The close view of the tags shapes my understanding the most because it makes the family look labeled and controlled. That detail helps me see the loss of freedom even though the whole setting is not visible.
Check for Understanding (RI.7.6, RI.7.7) |
|---|
Name one visual choice in the launch photograph and explain what it communicates to a viewer.
|
Modeling: |
If students only describe the image, prompt them to add a because statement and to name what might be outside the frame. |
Connection to Today’s Learning:
Say: Apply the same routine to one photograph and a written selection from Seen and Unseen so you can compare how each medium shapes understanding of the same historical experience.
Display the comparison photographs.
Display and read aloud a selected short text describing daily life in the barracks at Manzanar, such as pp. 42-44 of Seen and Unseen.
Teach: Comparing an Image with a Written Selection
When I compare an image with a written selection, I do not ask which one is right. I ask what each medium makes easier to notice. A photograph lets me study visual details all at once, like who is centered, how close the camera is, and what is cropped out. A written selection gives me words for movement, feeling, or background information that the photograph cannot fully explain on its own. Then I look for overlap by asking what both sources emphasize. Finally, I name one difference, because that difference shows how each medium shapes understanding in a unique way.
Pair students and assign each pair one image to begin. Students should record the photographer, the source, and any caption information on the organizer as part of responsible research practice.
Say these Directions: With your partner, study the photograph, its caption, and the written text. First, record the photographer, the source information, and the text landmark. Then use your organizer to note what the photograph emphasizes and what both sources help you understand.
Ask: The photographer chose this distance, this angle, and this frame. What is one thing that would change if the photographer had stood ten feet farther back or ten feet closer? What would the viewer gain, and what would they lose?
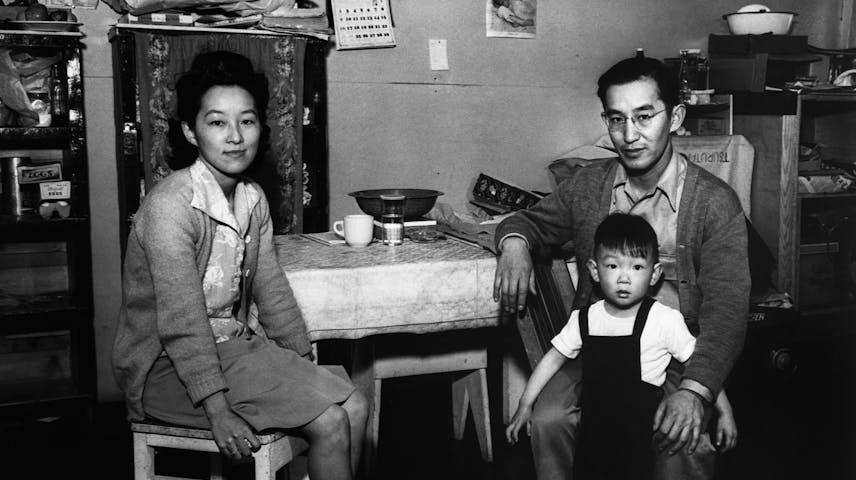
If the photographer had stood farther back, we would see more of the barracks and the camp environment, which would make the setting feel more like a prison. But we would lose the close-up details, like the expressions on the children's faces and the items on the table. So we would get to know the family more but lose the information about where they are living.
Ask: How does the caption add to, confirm, or complicate what the photograph shows?
The caption helps confirm where the image was taken and who made it, which changes how I read the picture. If I know the photographer was incarcerated at the camp, living the same life as the people in the photograph, I read the image differently than if it were taken by a visiting photographer. I think that the photographer knew many of the people in the photos and that people trusted him to take their pictures. I also wonder about rules and limitations he might have had that an outside photographer would not.
Ask: How does this photographer’s perspective shape what viewers understand about Japanese American incarceration?
It shapes viewers’ understanding by emphasizing dignity and family closeness. Viewers may see the humanity and strength of the family clearly, but they may not immediately see the harsh limits of camp life because those details are not the main focus.
Ask: What do the image and its caption help you understand about Japanese American incarceration that the text alone does not or vice versa?
Together, the sources show that camp life included ordinary routines, but those routines happened inside confinement. The photograph helps me see the physical scene while the written selection helps me understand the larger meaning and limits behind it.
Teacher Guidance: As pairs discuss, check for:
Student records photographer and source information accurately.
Student identifies at least one visual choice and one absence.
Student uses both the photograph and the written selection to explain meaning.
Students now choose one of the photographs and turn their notes into a short research-based annotation. This annotated organizer is the carry-forward artifact for Lesson 23.
Display the following writing model if needed for support and guidance:
The family portrait at Manzanar presents camp life through a calm, respectful frame. The family is centered and posed, which makes viewers focus on dignity and togetherness. Because the photograph does not emphasize guards, fences, or crowding, it can hide some of the restrictions of incarceration. The image reveals something true about family strength, but it does not show the whole reality of camp life. This perspective matters because viewers may remember the scene differently depending on what the photographer includes.
Teach: Turning Notes into a Perspective Annotation
A strong annotation does three things in a clear order. First, it names the photographer and what the image shows. Next, it explains one or two visual choices and what those choices communicate. Finally, it points out what is left out so the reader understands the limits of the source. That structure helps your writing stay focused and responsible.
Say these Directions: Choose one photograph from today’s set. Use your organizer notes to write a 4–5-sentence annotation that explains how the photograph shapes what viewers understand and what it may hide. In your annotation, use at least two of these words: perspective, framing, proximity, cropped.
Ask: How does your chosen photograph shape what viewers understand, and what does it leave out that a written text might make visible?
This photograph shapes viewers’ understanding by showing people living daily life inside the camp instead of only showing removal or punishment. The framing makes the community visible, which helps viewers see that incarcerated people kept creating relationships and routines. At the same time, parts of the camp system are cropped out, so the photo does not fully show the lack of freedom surrounding that daily life. This perspective reveals resilience, but it also reminds me that one image cannot tell the whole story.
Scoring Rubric
Criterion | 1—Developing | 2—Approaching | 3—Meets |
|---|---|---|---|
RI.7.6—Analyzing how perspective shapes a source | Names the photograph or retells what it shows without explaining perspective | Identifies a visual choice and gives a partial explanation of its effect | Explains how one or more visual choices shape viewer understanding and identifies a meaningful absence |
W.7.8—Recording and using source-based evidence | Uses vague or missing source details | Includes some source information or evidence but not clearly | Uses notes from the image and caption accurately, including photographer/source information |
Say these Directions: When you finish your annotation, sketch a quick alternate version of the same scene on notebook paper. Change one visual choice—such as distance, angle, or what is cropped out—and write one sentence explaining how your new version would change the message.
Ask: What would you change in your alternate frame, and how would that change the viewer’s understanding?
I would zoom out to include more of the barracks. That would change the viewer’s understanding because the scene would feel less calm and more connected to confinement.
Pulse Check (RI.7.6, RI.7.7) |
|---|
Which statement best explains why a credible photograph and a credible written source can lead viewers to different impressions?
|
Keep the reflection focused on students’ research process so it directly supports the next lesson’s carry-forward work.
Say these Directions: Today, you practiced reading photographs as sources shaped by perspective and compared this with written text. In your Quick Write, respond to at least two of the reflection prompts so you can track what you learned and what you still need for Lesson 23.
Ask: Respond to at least two of these prompts:
What new information did you learn today about how photographs and written sources shape what history viewers remember?
What new inquiry question arose from today’s work?
What changes, if any, do you need to make to your process when analyzing visual sources?
What are your next steps for selecting a photograph in Lesson 23?
I learned that photographs can show something true and still leave out important parts of the story. The image helped me see the physical setting fast, but the text added context I would not have known from the picture alone. My new question is how viewers in the 1940s reacted differently when they saw these images with or without written explanation.
I learned I need to slow down and look for what is missing, not just what is in the image. Next time, I will record the photographer and caption details first so my annotation has stronger source evidence.
Instruct students to complete the following:
Review your completed Media Literacy Image Analysis organizer.
In your Journal, star one photograph you may want to use in Lesson 23.
Write one question you still have about the perspective behind it.
Seen and Unseen
Elizabeth Partridge & Lauren Tamaki
Exposing Injustice: Incarceration of Japanese Americans
Dorothea Lange Digital Archive at the Oakland Museum of California